“Raspberry pi connected to the internet, digital art” DALL·E 2
Cheap and easy IoT with AWS
In this article, I will explain how you can make your own IoT device using a Raspberry Pi and some free AWS services.
What is IoT?
The Internet of Things (IoT) is the name given to devices which can communicate and/or be controlled over networks such as the internet. Examples include smart home appliances like lights or thermostats.
Why use IoT?
IoT functionality can significantly increase the cost of products because of the extra hardware required and because of the costs associated with running the networks which allow them to communicate. Why then go to the trouble of adding IoT to your product or buying a product with IoT functionality?
IoT functionality can provide many useful features:
- it can allow devices to be controlled remotely
- allow systems to be easily operated by a timer or respond to sense data
- integrate with voice assistants like Alexa, Google, or Siri
What you’ll need
- A Raspberry Pi with an internet connection, this will become the brains of your IoT device.
- An AWS account, you’ll need this to create and manage the AWS services you’ll use.
1. Creating the SQS queue
The Simple Queuing Service is an AWS service which allows sending and receiving messages via a web service. We can use an SQS to allow an Alexa skill and a Raspberry Pi to communicate via the internet.
Create an SQS queue from the AWS console.
Create an IAM role with permission to read and write from the queue you just created so you can send and receive messages from it programmatically.
Download the CSV with the secrets for your new role and save it somewhere safe for later (in a password manager for example).
2. Writing a custom Alexa skill
An Alexa skill is effectively a third party app which you can add to your Amazon account to extend the functionality of your Alexa enabled devices. By creating an Alexa skill we can use Alexa to control our IoT device.
Go to the Alexa developer console and click the create skill button: this will prompt you to add a name for your skill. Once you have entered the name of your skill select the language you want to create your skill for and then select the custom model option. Finally select the Alexa-hosted Python option to host the backend for your new skill.
You will now see the Alexa Developer console which provides you with all the tools you need to build your skill. An Alexa skill has three main components:
- an invocation name which is used to open the skill i.e. “Weather App”
- an interaction model which consists of intents (things you can ask the skill to do i.e. “Tell me what the weather will be like tomorrow)
- a Lambda function which handles requests made to the skill.
Your invocation name is the same as the name of your skill by default, you can change this but due to some quirks of the skill publishing and certification process it is often easier to create a new skill with a different name at this stage rather than changing the invocation name.
Add new intents to your interaction model by selecting the “Intents” option under the interaction model tab. To further customise your intent you may wish to use slots, which are essentially variables in the context of Alexa intents.
If you want to be able to make requests to Alexa which includes data like times, numbers, search queries etc you will need to use a slot to specify where in the intent that data goes and what that data should look like. Either use a pre-existing slot type (in the example intent below the message slot is an AMAZON.SearchQuery slot) or define your own by selecting the “Create Custom Slot” option from the slots tab and specifying possible values for the slot.
If you wanted to create a slot that would allow a user to specify whether they want the lights on or off you could create a custom slot called lights with the possible values “on” or “off” and then include this an intent to control the lights.

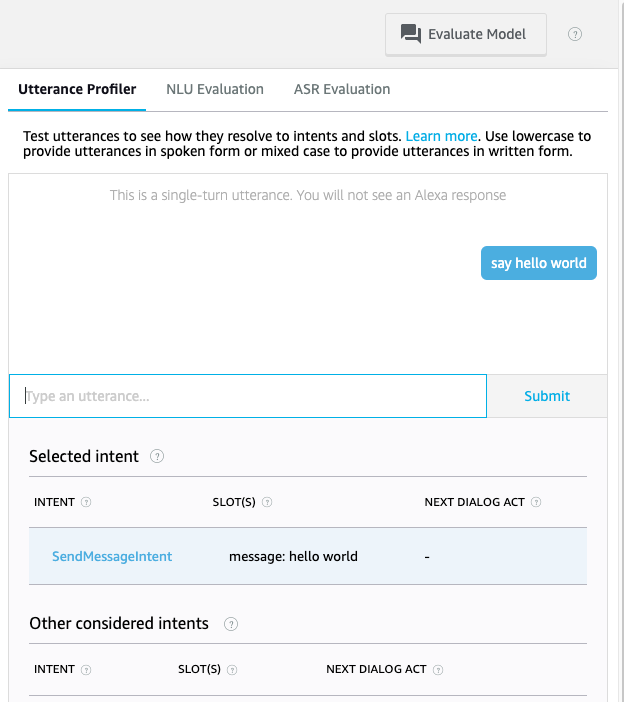
Once you have added your new intent or intents to the model save and build the model. You can now test your new intents by clicking the evaluate model. Once you’re happy with your new intents you can modify the Lambda function which handles intents by opening the Code tab.
Add the following snippet to the lambda_function.py file before the LaunchRequestHandler. Enter the credentials from the role you created earlier and the details of your SQS queue. This snippet will allow you to connect to the SQS queue and push messages to it. Later we will read these messages with the Raspberry Pi.
access_key = '********************'
access_secret = '********************'
region = '********************'
queue_url = '********************'
client = boto3.client('sqs', aws_access_key_id = access_key, aws_secret_access_key = access_secret, region_name = region)
def push_message(client, message_body, url):
    response = client.send_message(QueueUrl = url, MessageBody= message_body )
Add an intent handler for your new intent as below, make sure you also add your intent handler to the skill builder at the end of the file.
class SendMessageIntentHandler(AbstractRequestHandler):
    """Handler for SendMessage Intent."""
    def can_handle(self, handler_input):
        # type: (HandlerInput) -> bool
        return ask_utils.is_intent_name("SendMessageIntent")(handler_input)
def handle(self, handler_input):
        # type: (HandlerInput) -> Response
        message = get_slot_value(handler_input=handler_input, slot_name="message")
        push_message(client, message, queue_url)

        speak_output = "OK"
return (
            handler_input.response_builder
                .speak(speak_output)
                # .ask("add a reprompt if you want to keep the session open for the user to respond")
                .response
        )
sb = SkillBuilder()
sb.add_request_handler(LaunchRequestHandler())
sb.add_request_handler(SendMessageIntentHandler())
sb.add_request_handler(HelpIntentHandler())
sb.add_request_handler(CancelOrStopIntentHandler())
sb.add_request_handler(FallbackIntentHandler())
sb.add_request_handler(SessionEndedRequestHandler())
sb.add_request_handler(IntentReflectorHandler()) # make sure IntentReflectorHandler is last so it doesn't override your custom intent handlers
sb.add_exception_handler(CatchAllExceptionHandler())
lambda_handler = sb.lambda_handler()
Save and deploy your skill. You can now test your skill by going to the Test tab and invoking your skill followed by one of your new intents. You should be able to see new messages being added to your SQS queue by using the send and receive option in the AWS console and polling your queue for messages.
3. Setting up the Raspberry Pi
Get your Raspberry Pi loaded up with your OS of choice. Create a new Python script and add the below code snippet. On running this script you should see a message from your SQS queue printed to the Python shell (if there aren’t any messages in your queue yet you can either use your new Alexa skill or the AWS console to push some messages for testing).
import boto3
access_key = '********************'
access_secret = '********************'
region = '********************'
queue_url = '********************'
client = boto3.client('sqs', aws_access_key_id = access_key, aws_secret_access_key = access_secret, region_name = region)
def pop_message():
    responses = client.receive_message(QueueUrl = queue_url, MaxNumberOfMessages = 10)
if 'Messages' in responses:
    messages = responses['Messages']
    client.delete_message(QueueUrl = queue_url, ReceiptHandle = messages[0]['ReceiptHandle'])
    return messages[0]['Body']
message = pop_message()
if message:
    print(message)
Using the systemd linux utility you can run this script when your Raspberry Pi boots up, so all you need to do is connect your Pi to power for it to start reading messages from SQS.
You can then take the messages you read from the queue and use the payload for whatever you want, you could: control lights using the GPIO pins on the Raspberry Pi, play a song from a bluetooth device connected to the Raspberry Pi, or even turn up your heating on your way home.
Conclusion
The versatile nature of SQS queues means that you can use this pattern for a variety of different applications. You can even use a second queue or modify your existing queue to allow messages to be sent back from the Raspberry Pi to the Alexa skill to output data from sensors or other devices.
Whilst this approach isn’t the most scalable (for large numbers of devices see AWS IoT) for small projects this is a quick and easy approach.